Guide · Start here
Getting started
Everything you need to go from “I’ve downloaded a file” to a station name on the screen. No jargon, no assumptions about what you already know, and a picture of every screen you should be looking at. If you only read one thing, read which mode is mine — almost every problem starts with the wrong one.
On this page
- What it is, and who it’s for
- Which mode is mine?
- Get the file and open it
- SDRConnect, step by step
- IQ File, step by step
- MPX Stream, step by step
- Network SDR, step by step
- Reading the screen
- Scanning the band
- Mapping a recording
- The DX log
- Settings worth touching
- If something isn’t working
- Getting help
01 · The short version
What it is, and who it’s for
RDS Bridge reads the hidden data that FM stations broadcast alongside their audio — the station name, the identity code, the scrolling text — and shows it to you as it arrives. It is one file that runs in your browser. There is nothing to install.
Who wants this
- FM DXers. The main audience. When a distant station fades up for eight seconds, Bridge is trying to pull an identity out of those eight seconds — and to tell you honestly how much of it to believe.
- Anyone with a band recording. Load an IQ recording and work it at leisure, as many times as you like, with the settings you wish you’d used at the time.
- People who want a second opinion. If your SDR software already decodes RDS, Bridge shows its decode next to yours so you can compare them on the same signal.
- Anyone curious about what’s riding on their local FM band. No radio expertise needed beyond getting a signal into it.
Who probably doesn’t
- If you want to listen to the radio, use your SDR software. Bridge decodes; audio is there to confirm what you’re looking at, not as the point.
- If you want DAB, AM data or HD Radio. Bridge is FM RDS and RBDS only.
- If you have no SDR at all. Bridge is a decoder, not a receiver. It needs a signal from somewhere.
What you need before you start
- A Chromium browser — Chrome, Edge or Brave. Firefox and Safari will not work, and this is the single most common cause of “it just doesn’t do anything”. If you’re on a Mac, Safari is the default browser, so check.
- A signal source — an SDRplay receiver, a recording, another SDR application, or a radio on your network. Section 02 works out which you have.
- Nothing else. No account, no installer, no server. Nothing you do in Bridge leaves your machine.
02 · The important bit
Which mode is mine?
Bridge has four ways of getting a signal, shown as tabs down the left of the window. Everything to the right of them behaves identically. Find the row below that describes your kit, then jump to that walkthrough.
I have an SDRplay receiver (RSPdx, RSPdxR2, RSP1A, RSPduo…) plugged into this computer, and I run SDRConnect.
SDRConnect Go to the walkthrough → Nothing extra to download.
I have a recording of the band — an IQ file made by SDRConnect, SDR Console, SDRuno or similar — and I want to work it now.
IQ File Go to the walkthrough → Nothing extra to download.
I have some other SDR and I use SDR Console, SDR++, SDRuno or similar on this computer. My radio isn’t an SDRplay, or I just prefer my own software.
MPX Stream Go to the walkthrough → Needs a virtual audio cable.
My radio is somewhere else on my network — an RTL-SDR in the loft running rtl_tcp, or an Airspy behind a SpyServer.
Network SDR Go to the walkthrough → Needs the free helper program.
Still not sure?
If your radio is plugged into this computer and it’s an SDRplay, use SDRConnect mode — it’s the least work and gives you the most (tuning from the page, the waterfall, the band scan, antenna switching). If your radio is plugged into this computer and it isn’t an SDRplay, use MPX Stream. Everything else is a special case.
03 · Common to every mode
Get the file and open it
This part is the same whichever mode you end up in, and it takes about a minute.
-
Download the file
Open the latest release page. Under Assets you’ll find a list of files. You want the one called index.html. Click it and save it somewhere you’ll find again — your Desktop is fine.
Ignore the other files for now. The ones starting rds-bridge-helper- are only needed for two of the four modes, and the walkthroughs will tell you if yours is one of them.
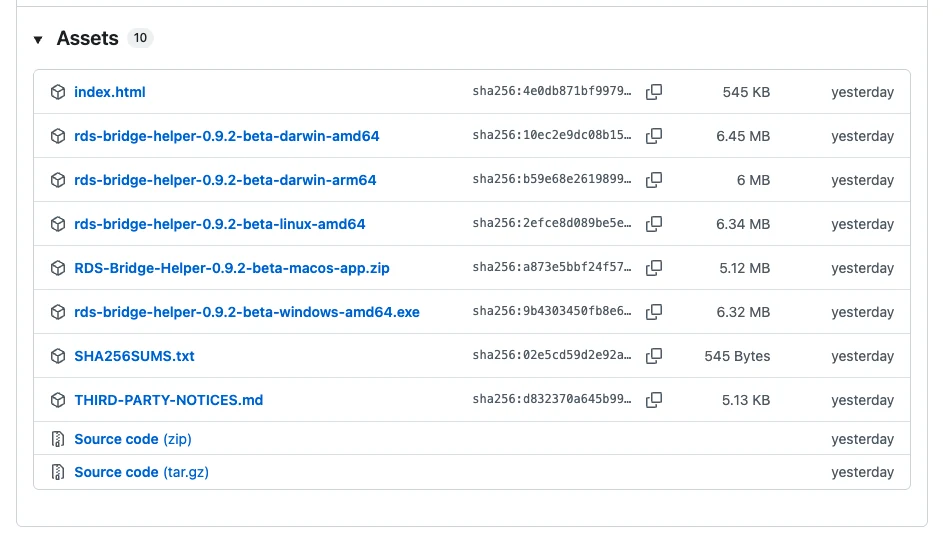
The release page. index.html is the whole application. -
Double-click it
It opens in your browser and it is already running. That’s the install — there isn’t one. The address bar will show something starting file://, which is correct and expected.
If it opens in Firefox or Safari, close it. Right-click the file and choose Open with → Chrome, Edge or Brave. Bridge will tell you if you’re in an unsupported browser, but it can’t work round it.
-
Have a look round before connecting anything
The tabs down the left are your four sources. The panels on the right are the read-outs, and they’ll be empty. Top right you’ll find help (the full in-app reference, which goes deeper than this page) and self‑check — remember that one, it’s the first thing to press if anything goes wrong later.
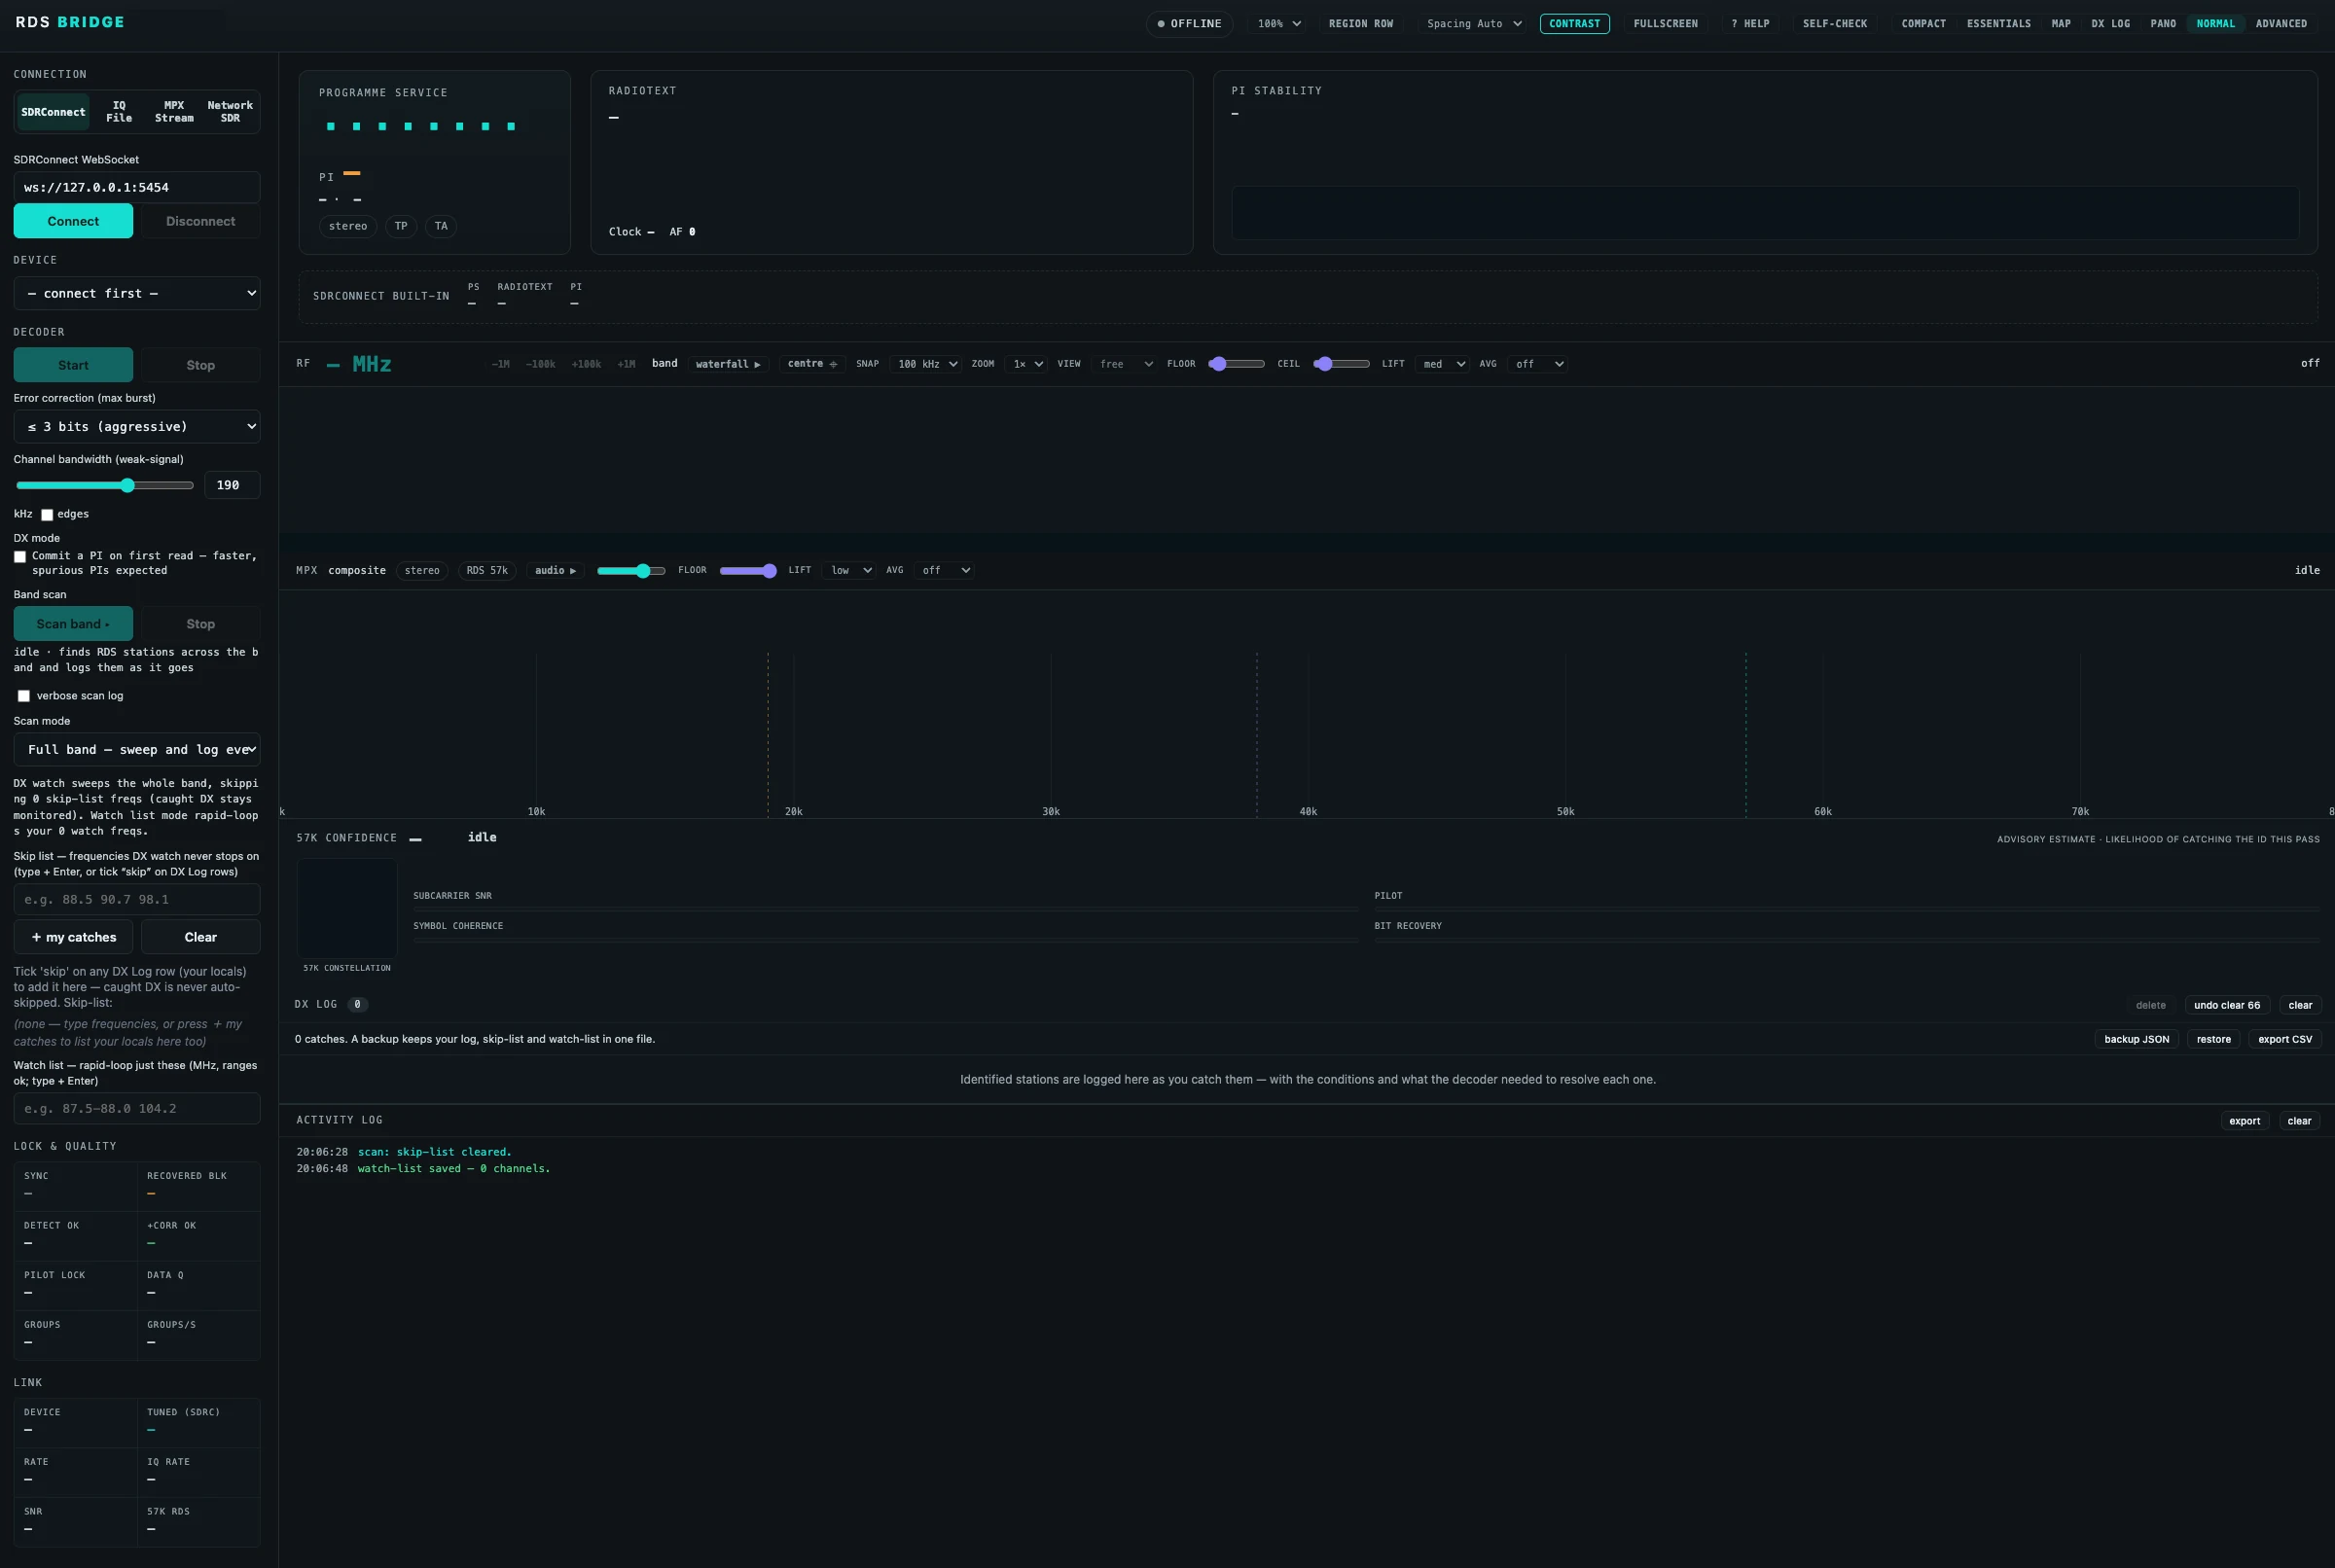
First open, before anything is connected. -
Keep it handy
Bookmark the local file, or leave it on the Desktop. To update later, download the new index.html from the release page and replace the old one. Your settings live in the browser, not in the file, so they survive the swap.
Why is it one file?
Because that removes every step where something can go wrong on your machine and not on mine. There is no installer to be blocked, no dependency to be missing and no version of anything else to be wrong. It also means nothing is uploaded anywhere — the decoding happens in your browser, on your computer.
04 · Walkthrough
SDRConnect, step by step
For an SDRplay receiver plugged into this computer. This is the fullest mode: Bridge tunes the radio for you, paints the waterfall, switches antennas and can scan the whole band on its own.
-
Start SDRConnect and get a device running
You need SDRConnect 1.0.6 or later — earlier versions have no way for Bridge to talk to them. Any SDRplay model works except the original RSP1.
Start SDRConnect, select your radio, and press play so it is actually receiving. If SDRConnect isn’t running and started, Bridge has nothing to connect to.
-
Turn on SDRConnect’s WebSocket API
This is the one setting people miss. Open SDRConnect’s Preferences and turn on WebSocket Server. It listens on port 5454, which is the address Bridge already has filled in. You only ever do this once.
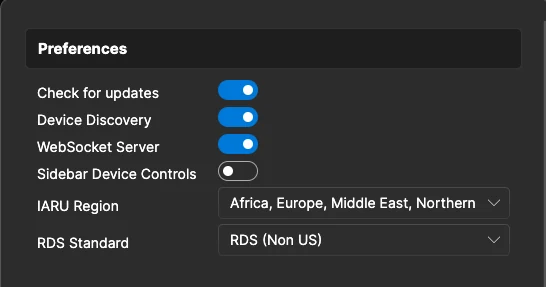
SDRConnect’s Preferences. WebSocket Server on — once only. -
In Bridge, choose the SDRConnect tab and press Connect
Leave the address as it is unless you know you’ve changed something. Press Connect. Within a second or two the panel should show your radio’s model, its sample rate and the antenna ports it offers.
If nothing happens, it is almost always one of two things: SDRConnect isn’t running with a device started, or the WebSocket API isn’t switched on. See problems.
-
Press Start
The waterfall fills in and the decoder begins. Connect establishes the link; Start begins the decoding. You need both.
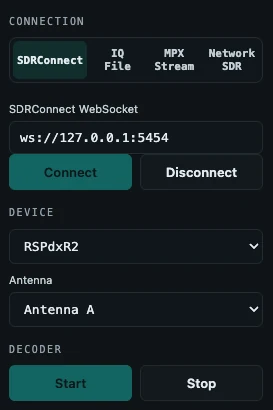
Connected and running. -
Tune to a station you know
Click a peak on the waterfall, or type a frequency. Start with a strong local — you want something that will definitely decode, so you can confirm the whole chain works before you go chasing anything difficult.
Within a second or two the station name should appear. That’s a working setup. Now go to reading the screen.
Antenna ports
If your model has more than one antenna input, the dropdown in the source panel switches it from the page, so you don’t need to go back to SDRConnect to try the other one.
05 · Walkthrough
IQ File, step by step
For working a recording after the event. Nothing to download, nothing to configure — if you have a file, this mode works in about thirty seconds.
-
Choose the IQ File tab and pick your recording
Bridge reads the common recording formats produced by SDR software, and it reads them straight off your disk — nothing is copied, converted or uploaded, and a very large file is fine.
If your recording came with a separate small file alongside it describing the frequency and sample rate, keep the two together; Bridge will use it to set itself up correctly.
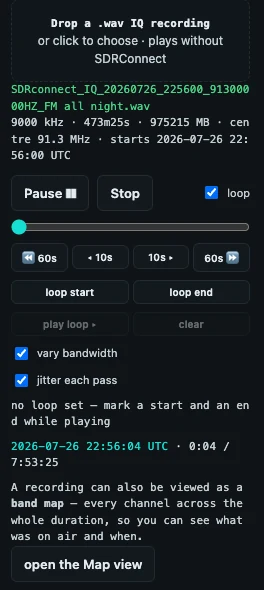
The IQ File panel with a recording loaded. Length, sample rate, centre frequency and start time are read from the file. -
Check the summary line under the file name
Bridge works both of these out for itself. The sample rate comes from the recording. The centre frequency comes from the file name, in the convention SDRuno and SDRConnect use — a run of digits followed by HZ, as in …_91300000HZ_… — or, for SDR Console recordings, from the parameters it writes inside the file.
If it says no centre frequency was found, the recording still decodes perfectly. You lose only the ability to work in real MHz: the readout shows a dash, tuning is relative to the middle of the recording, and catches log without a true frequency. There is no box to type the centre into — if you want it back, rename the file so it carries the frequency in that convention, and load it again.
-
Press play
It behaves like a live radio: tune within the recording, watch the waterfall, decode. You can replay the same moment as many times as you like with different settings, which is the whole point — a live signal never gives you a second go.
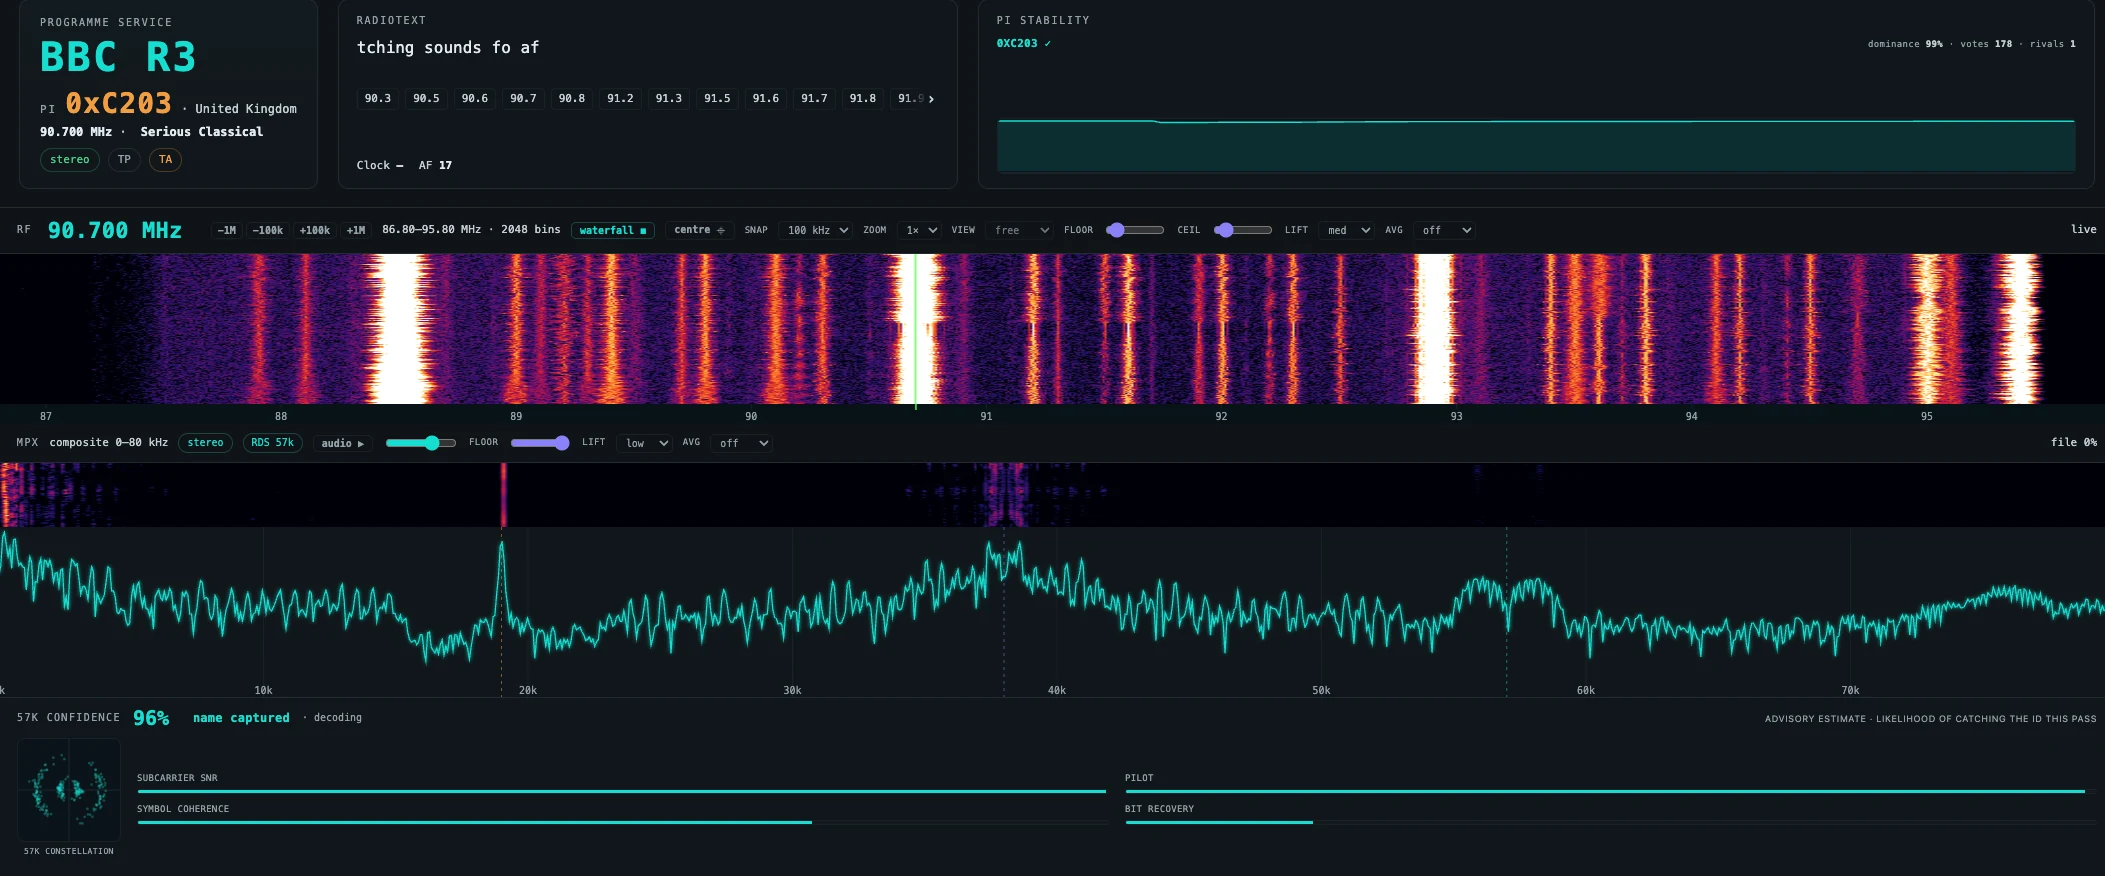
A recording decoding, half an hour into the file. Tap to enlarge. -
Or map it first
Rather than hunting through a long recording, build a band map and see the whole thing as a picture — every channel, the entire length of the file, in seconds. Then click straight to the interesting bits.
A note on very large recordings
Bridge decodes as fast as your computer can process the file. If your machine can’t keep up with a wide, fast recording in real time, the audio will stutter — but the decoding is unaffected, and Bridge tells you when it’s running below real time. Stuttering audio is not a sign that something is broken.
06 · Walkthrough
MPX Stream, step by step
For a radio that Bridge doesn’t talk to directly. Your SDR software demodulates the FM as usual, and passes Bridge the raw composite signal — the MPX — through a virtual audio cable. Bridge pulls the RDS out of that.
This one has the most moving parts
Two programs, an audio cable that isn’t a real cable, and a sample rate that has to match. Follow the steps in order and it’s reliable; skip one and you’ll get silence with no obvious reason. If you have an SDRplay, SDRConnect mode is much less work.
-
Install a virtual audio cable
This is a small free utility that makes your computer think it has an extra sound card, so one program’s output becomes another program’s input. On Windows, VB-Audio’s VB-CABLE is the usual choice; on a Mac, BlackHole. Install it and restart your SDR software so it sees the new device.
-
Set your SDR software to output composite / MPX
What you’re after is the undemodulated composite — not normal audio. In SDR Console it lives under Broadcast FM Options → MPX Forward: set Output device to the virtual cable you just installed and tick Enable. There is no rate to choose — it forwards at 192 kHz automatically, and the line underneath confirms it. SDR++ has a composite output of its own; wherever you can pick a rate, take the highest offered, because the RDS sits at 57 kHz and doesn’t survive a lower one.
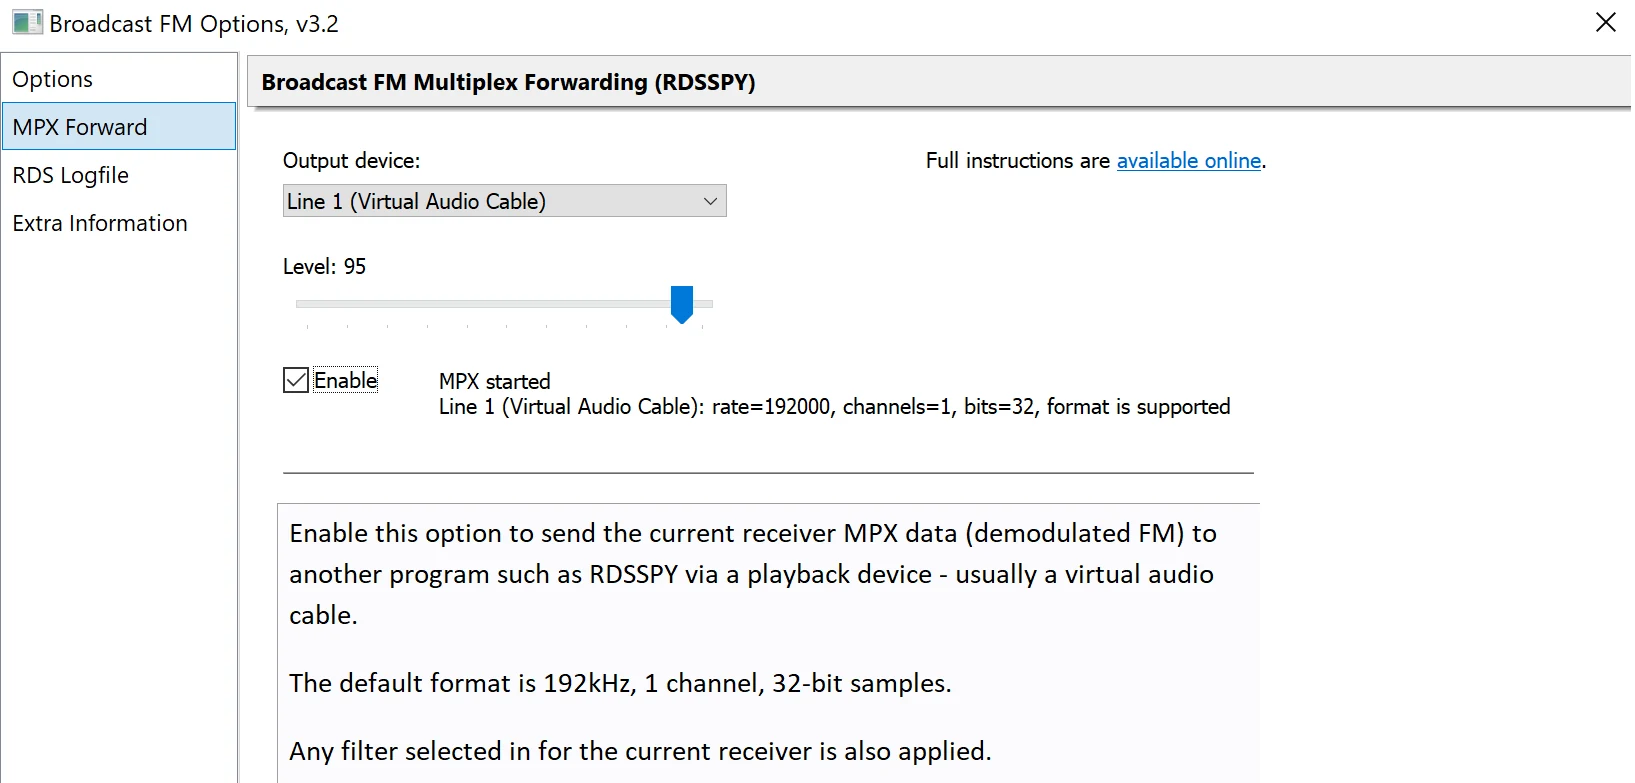
SDR Console’s Broadcast FM Options → MPX Forward. Output device set to the virtual cable, Enable ticked, and it confirms the format underneath. -
In Bridge, choose the MPX tab and select the cable as the input
Your browser will ask permission to use the microphone. That’s how a browser sees any audio input, including a virtual cable — you must allow it or nothing arrives. Then pick the virtual cable from the device list, not your real microphone.
The MPX spectrum display should come alive, with an unmistakable spike at 19 kHz — the stereo pilot. That spike is the test: if it’s there, the audio path is right.
Don’t go looking for an equally obvious one at 57 kHz. The RDS subcarrier is a low, broad bump even on a strong local, and it is easy to convince yourself it’s missing when the decode is working perfectly. The read-out that actually tells you is 57K confidence underneath, and the station name appearing.
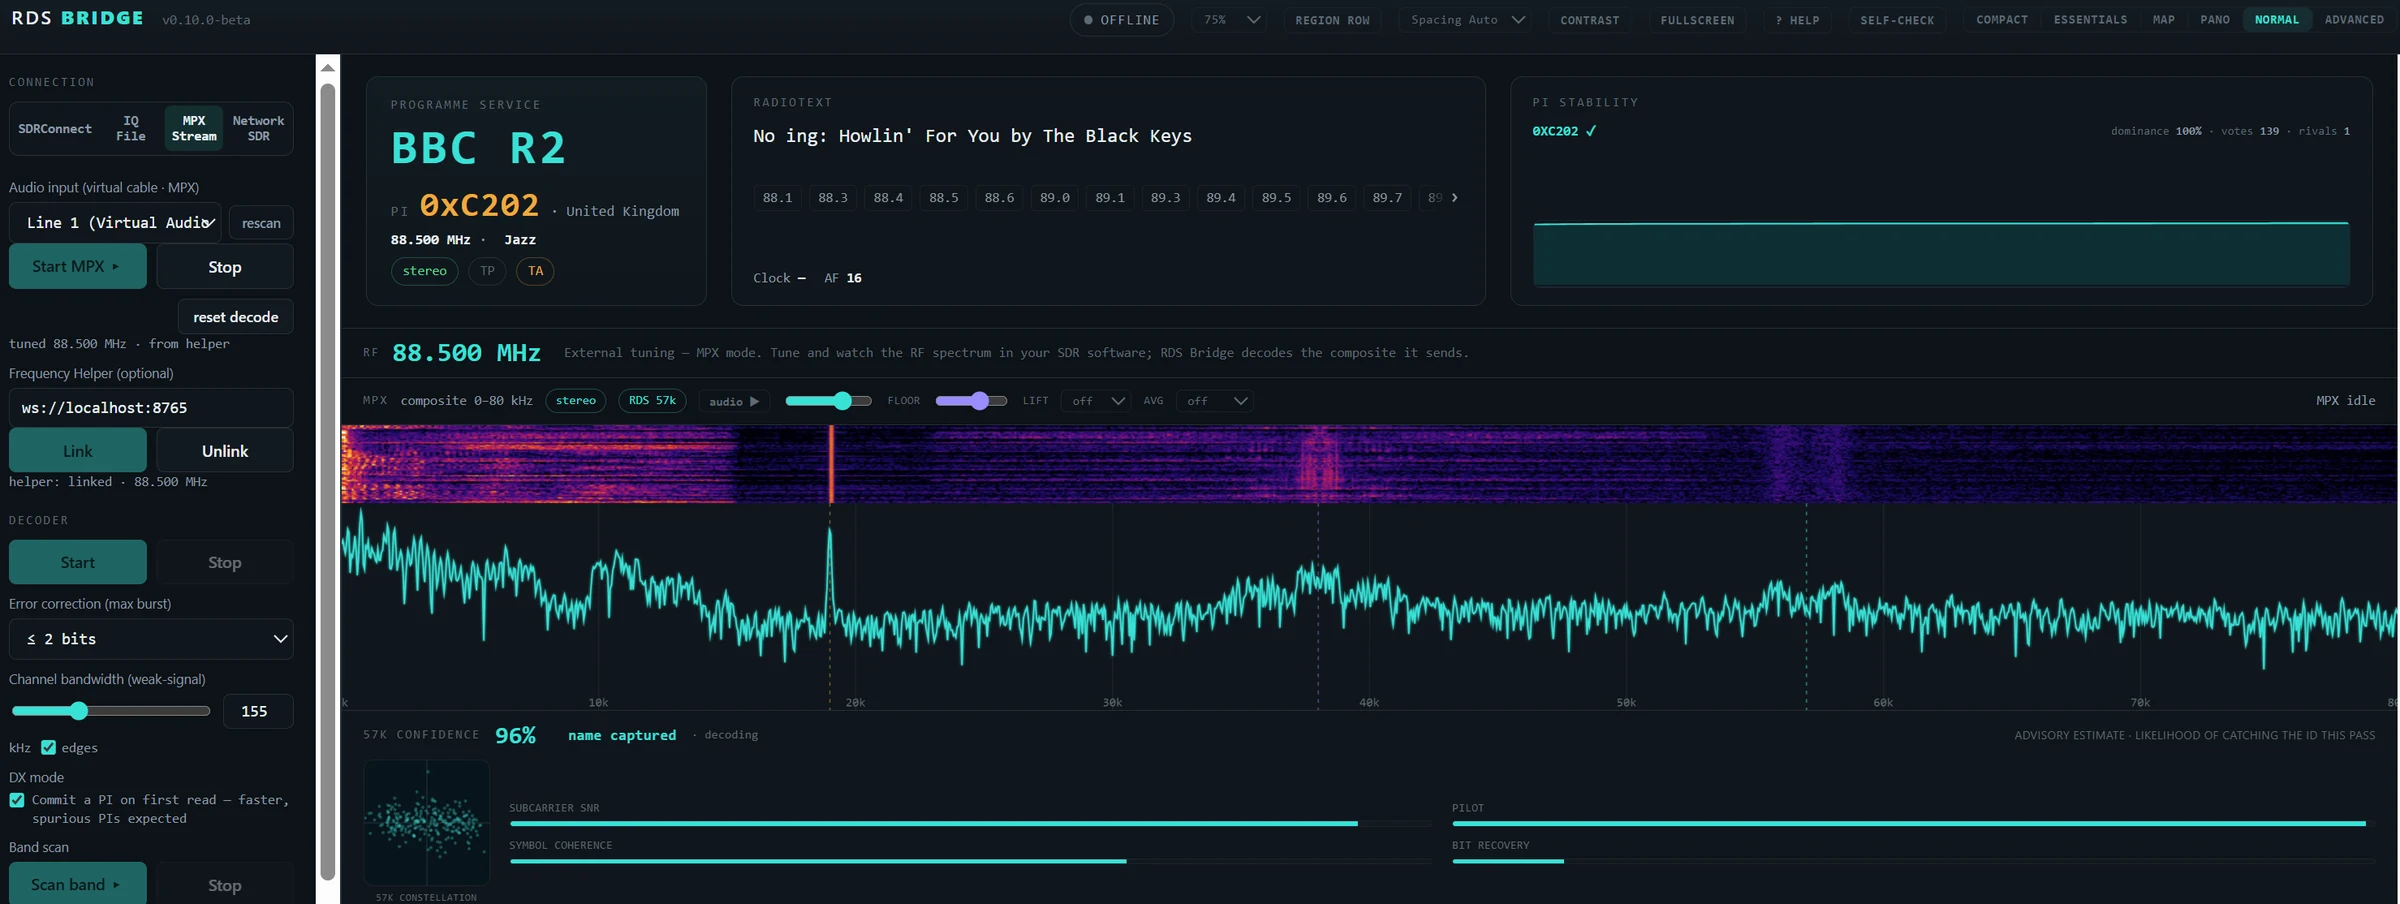
MPX mode working: BBC R2 decoded from the composite. The tall spike at 19 kHz is the stereo pilot. Tap to enlarge. -
Optional: let the helper fill in the frequency
Bridge has no way of knowing what your SDR software is tuned to, so catches will log without a real frequency. The free helper program fixes that: it reads the tuned frequency from your SDR software and passes it to Bridge, so the DX log comes out right. With SDR Console it can also tune the radio, which is what makes the band scan work in this mode.
Download it from the same release page — the file for your system, e.g. rds-bridge-helper-…-windows-amd64.exe on Windows. With SDR Console there is one extra piece: it shares its frequency over a serial CAT port, and two Windows programs can’t share one port, so you install a free virtual COM pair (com0com) and give each program one end. It’s a five-minute job you do once. Full setup is in the helper’s own guide. See also the helper notes below.
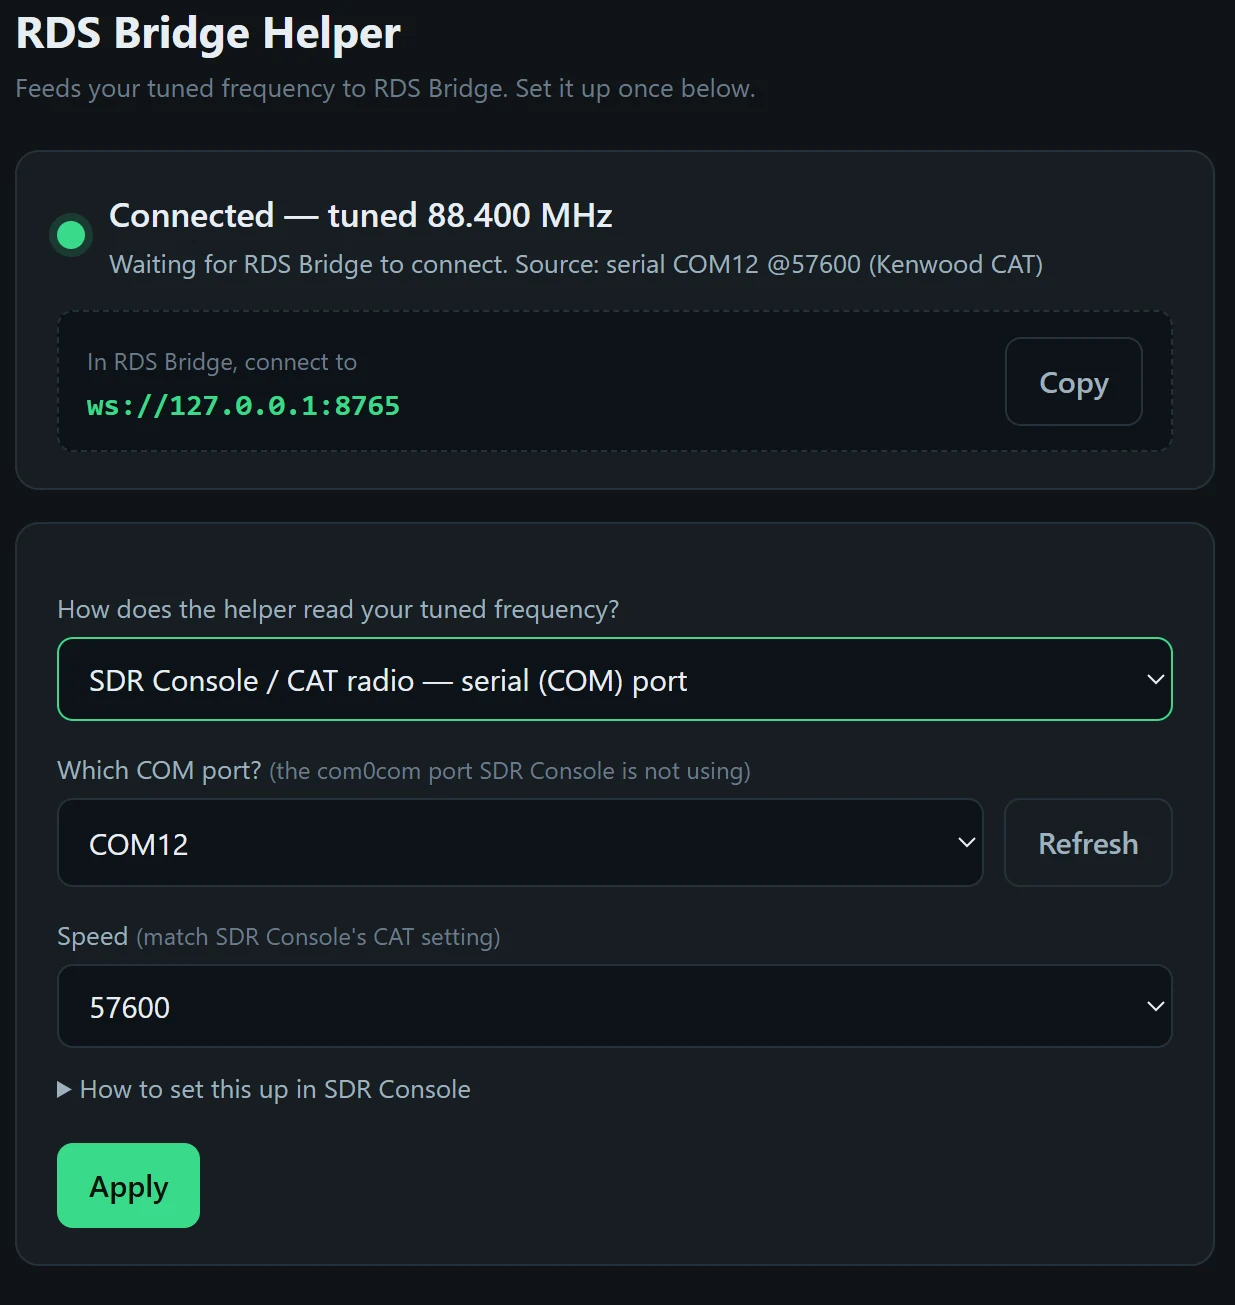
The helper connected to SDR Console over CAT, reporting the tuned frequency. Paste the address it shows into Bridge’s Frequency Helper row.
07 · Walkthrough
Network SDR, step by step
For a radio that isn’t attached to the computer you’re sitting at — an RTL-SDR in the loft running rtl_tcp, or an Airspy behind a SpyServer. A small helper program collects the stream and hands it to Bridge.
-
Get your radio serving on the network first
Whatever you normally do to make that radio available — run rtl_tcp on the Raspberry Pi, start SpyServer on the machine with the Airspy. Note its address and port. If you can already connect to it with other software, you’re ready.
-
Download the helper
From the same release page as index.html, take the file matching your computer:
- Windows — rds-bridge-helper-…-windows-amd64.exe
- Mac — RDS-Bridge-Helper-…-macos-app.zip (works on both Apple silicon and Intel)
- Linux — rds-bridge-helper-…-linux-amd64
It’s about 5 MB and there is nothing to install — it’s a single program you run.
-
Run it
Double-click it. A small black console window appears and stays open — that’s the program running, and closing it stops the helper. A configuration page opens in your browser automatically.
Windows may block it the first time, and macOS will want convincing the first time. Both are expected for a small program from an individual developer; the helper’s guide walks through it, and problems below explains what’s going on.
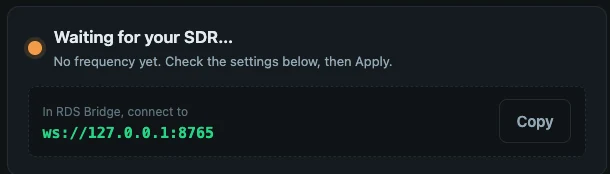
The page opens on a waiting state and shows the address Bridge needs. The Copy button saves typing it. -
Tell the helper where your radio is
On that configuration page, open the source dropdown and choose Network SDR — Airspy / RTL-SDR over SpyServer or Network SDR — RTL-SDR over rtl_tcp. Enter the address and port from step 1 — if the radio is on this same machine the defaults are already right — and press Apply. SpyServer is the tested route; rtl_tcp is marked experimental for a reason.
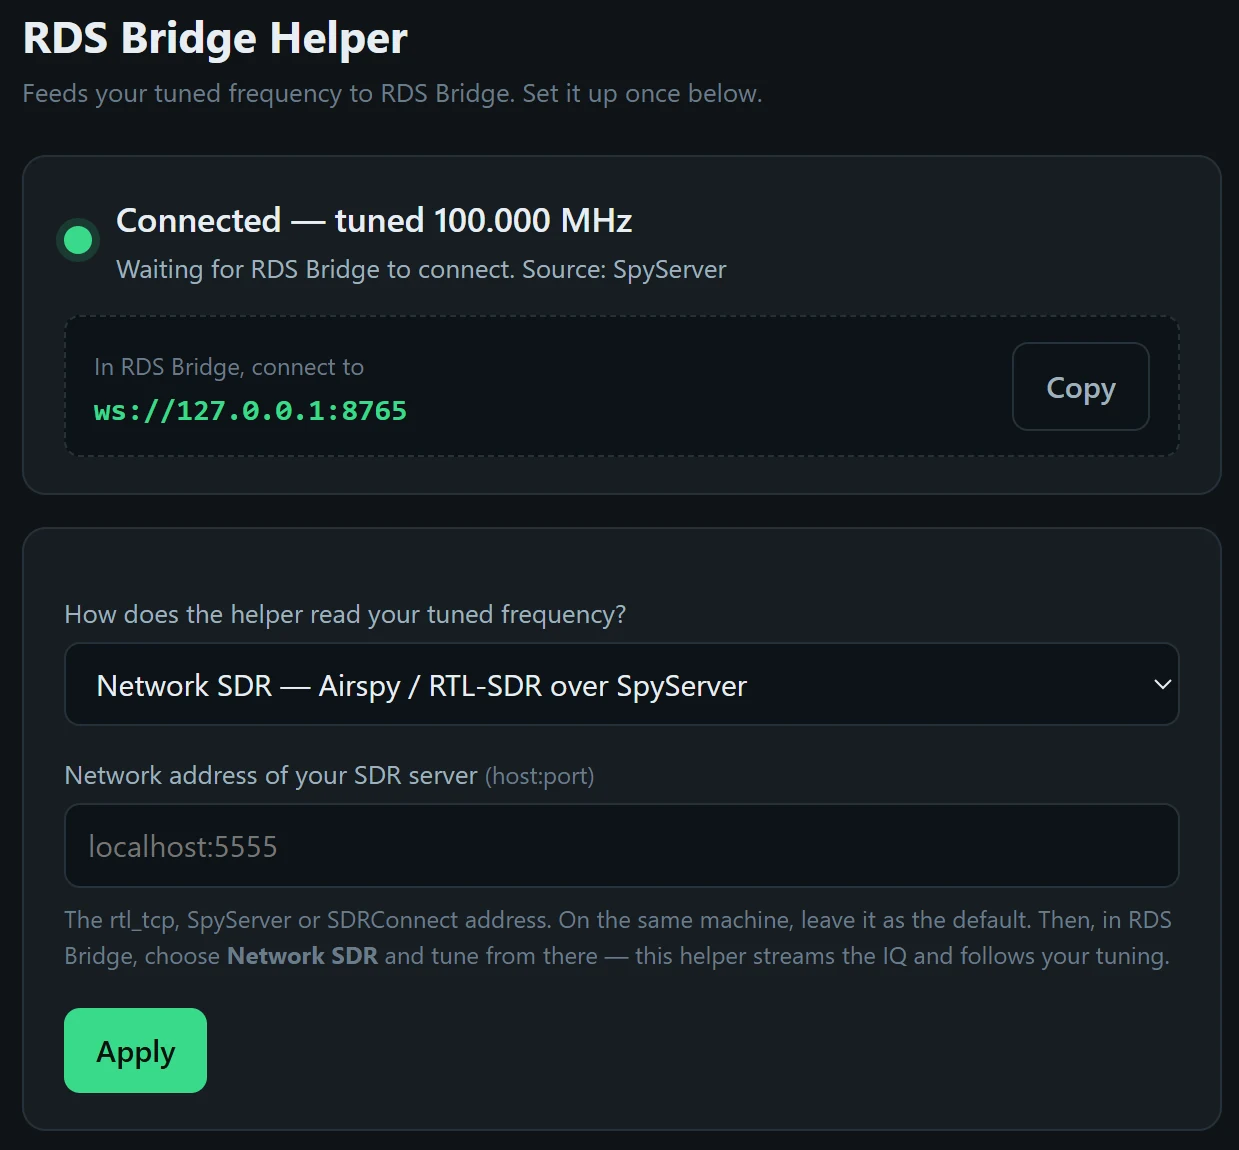
The helper set up for a networked radio. Leave the address alone if the receiver is on this machine. -
In Bridge, choose the Network SDR tab and connect
Bridge connects to the helper on your own machine, and the helper connects onward to the radio. Tune and decode exactly as in any other mode.
With SpyServer you also get the waterfall, because SpyServer sends a wideband view that the helper passes on. rtl_tcp doesn’t offer one, so with rtl_tcp you get the decode and no waterfall. That’s a limitation of rtl_tcp, not a fault.
Take the helper and Bridge from the same release
Their version numbers will often differ, and that is normal. The helper is only rebuilt when it changes, so a Bridge release frequently ships with a helper carrying an older number. That pairing is the tested one. What matters is that both came off the same release page, not that the numbers match.
Mixing releases is what causes trouble, and it doesn’t announce itself: an old helper with a newer Bridge gives you garbled decoding that looks exactly like a reception problem rather than an error message. If a setup that used to work suddenly produces nonsense, suspect this first.
08 · What am I looking at
Reading the screen
Once something decodes you get a lot of numbers at once. Here is what each one is for, in the order you’ll care about them. Nothing here needs to be understood to use Bridge — but the numbers are the difference between a catch you can log and a guess.
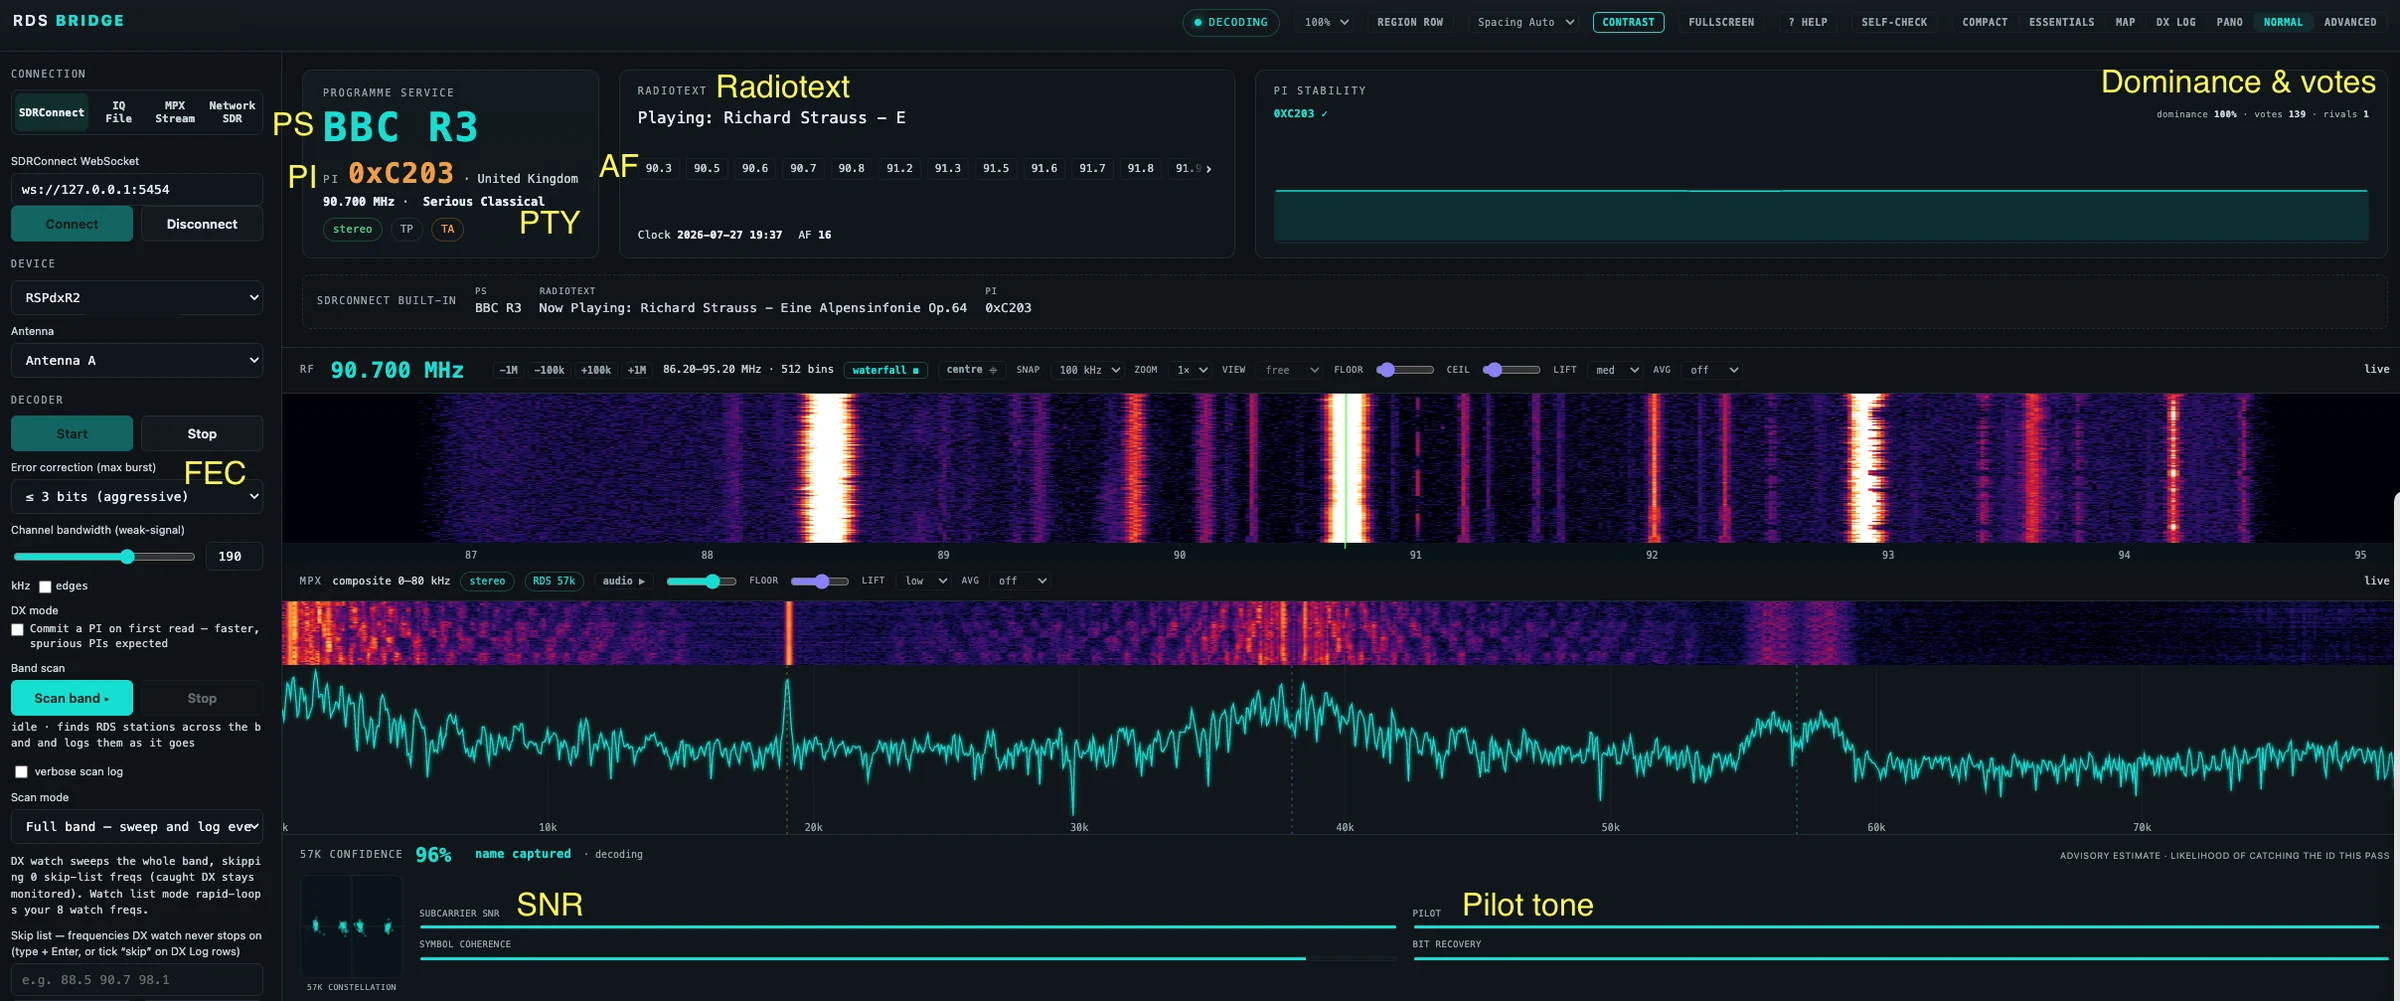
The one trap worth knowing about
A strong station on an adjacent channel can capture the receiver and deliver its RDS while you appear to be tuned elsewhere — so you get a real, correct decode logged on the wrong frequency. It’s most likely when a big local sits 100 kHz away from the channel you’re on.
None of the quality numbers reliably catches this: a captured neighbour can read better than a genuine weak catch. The defence is to be sceptical of a strong, clean decode on a channel that has a much stronger neighbour, and to check whether that same identity is already logged next door.
Views
The view selector changes how much is on screen without changing what Bridge is doing. Compact and Essentials for a glance, Normal for everyday use, Advanced for everything, Pano for watching a whole band on a deep waterfall, and Map for the band map. If the screen feels overwhelming, drop to Essentials — nothing is lost, it’s just hidden.
09 · Hands off
Scanning the band
Bridge can sweep the band on its own, tune each channel that has something on it, and log everything that decodes. Available in SDRConnect mode, on a networked SDR, and in MPX mode when the helper can tune your radio.
-
Run a Full band scan first
In the Decoder panel, choose scan mode Full band and press Scan band. One sweep of the whole band, logging everything it can identify. Do this once when you set up — it builds your DX log and, more usefully, tells you what your locals are.
-
Mark your locals as skips
Tick skip on the DX-log rows for the strong local stations, or press + my catches. The scan will stop wasting time on stations you can hear every day.
-
Leave DX watch running during an opening
DX watch sweeps continuously, skipping your locals, empty channels and the splatter around strong signals, so it converges on things that are genuinely new. This is the mode to start and walk away from. A station you actually catch is never skipped automatically.
-
Or camp on a watch list
Watch list loops only the frequencies you specify — individual channels and ranges, for instance 87.5-88.0 104.2. This is the one for the clear channels at the bottom of the band where Sporadic-E shows up first.
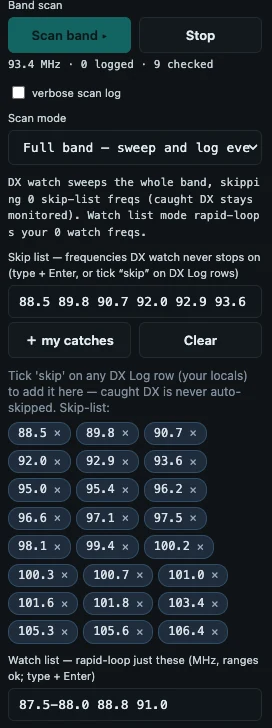
The scan controls, mid-sweep.
- Set your channel spacing to match your region. Auto is right for most people (100 kHz in Europe, 200 kHz in North America). Set it manually for grids that differ — 250 kHz for Thailand’s quarter-MHz channels, 50 kHz for Italy. Get this wrong and the scan steps straight over real stations.
- The scan can’t invent a station. It only points the radio and watches; every catch goes through the same decoder and the same confirmation as a manual tune.
- Turn on the verbose scan log if you want to see every channel and its level as it goes. Otherwise you get starts, catches, a progress note every thirty seconds, and the stop.
10 · IQ recordings only
Mapping a recording
A band recording contains far more than you heard while it played. The band map turns one into a picture — time running down the page, channels running across — so a two-minute opening on 90.7, half an hour in, becomes something you can see instead of something you had to be listening for.
-
Load your recording in IQ File mode
As in the IQ File walkthrough. The map is IQ-File-only — it needs the whole recording on disk to sample across, which a live radio can’t offer.
-
Switch the view selector to map and press build
It samples the file rather than reading it end to end, so even a very large capture maps in seconds rather than in the time it would take to play through.
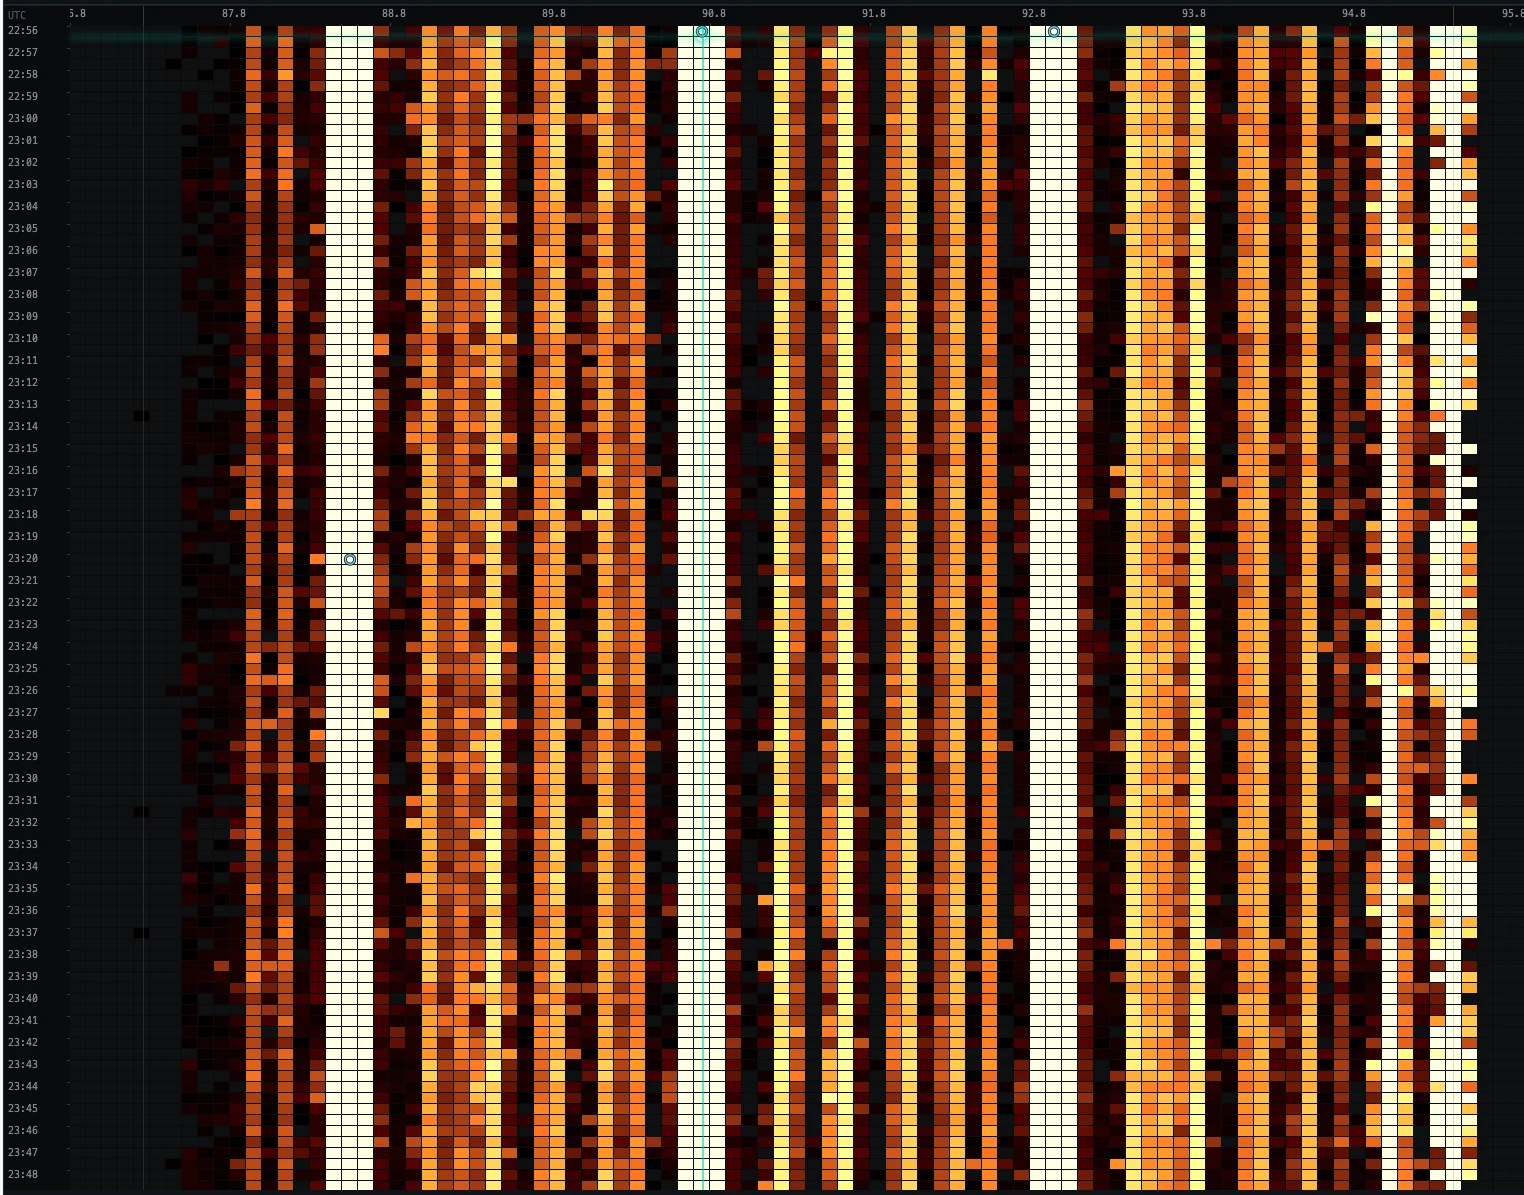
A mapped recording — two channels already ringed as catches. Each cell shows how far that channel stood above its own noise floor at that moment. Tap to enlarge. -
Read it
Bright means that channel stood well above its own noise floor in that slice of time. It is a presence map, not a signal-strength meter — a fading band and a strong one both read sensibly, and the numbers don’t compare between recordings.
Your existing catches from that recording are drawn on as rings. A bright column with no ring on it is something you haven’t identified yet — that’s the map earning its keep.
-
Click a cell to go there
The recording seeks to that moment, tunes that channel and starts playing with audio armed. A playhead marks where you are; it follows playback and gets out of your way as soon as you scroll off to read the map.
-
Loop a marginal signal
Set loop start and loop end around the interesting stretch and press play loop to run it repeatedly. The decoder restarts cleanly on every pass, deliberately — replaying identical samples must not be allowed to inflate the confidence in an identity that was never really there.
- Row length is five seconds by default and can be set from five seconds to five minutes. A recording long enough to overrun the canvas steps it up automatically.
- The edges of the capture are marked, not hidden. Channels beyond the two faint lines are outside the recording’s flat region — they’re real and worth checking, they just read low.
- Catches from elsewhere aren’t drawn. A catch made live, or from a different recording, has no position in this file, so it’s left off rather than placed at a guess.
11 · Keeping the results
The DX log
Every station Bridge identifies goes into the log, with the evidence attached.
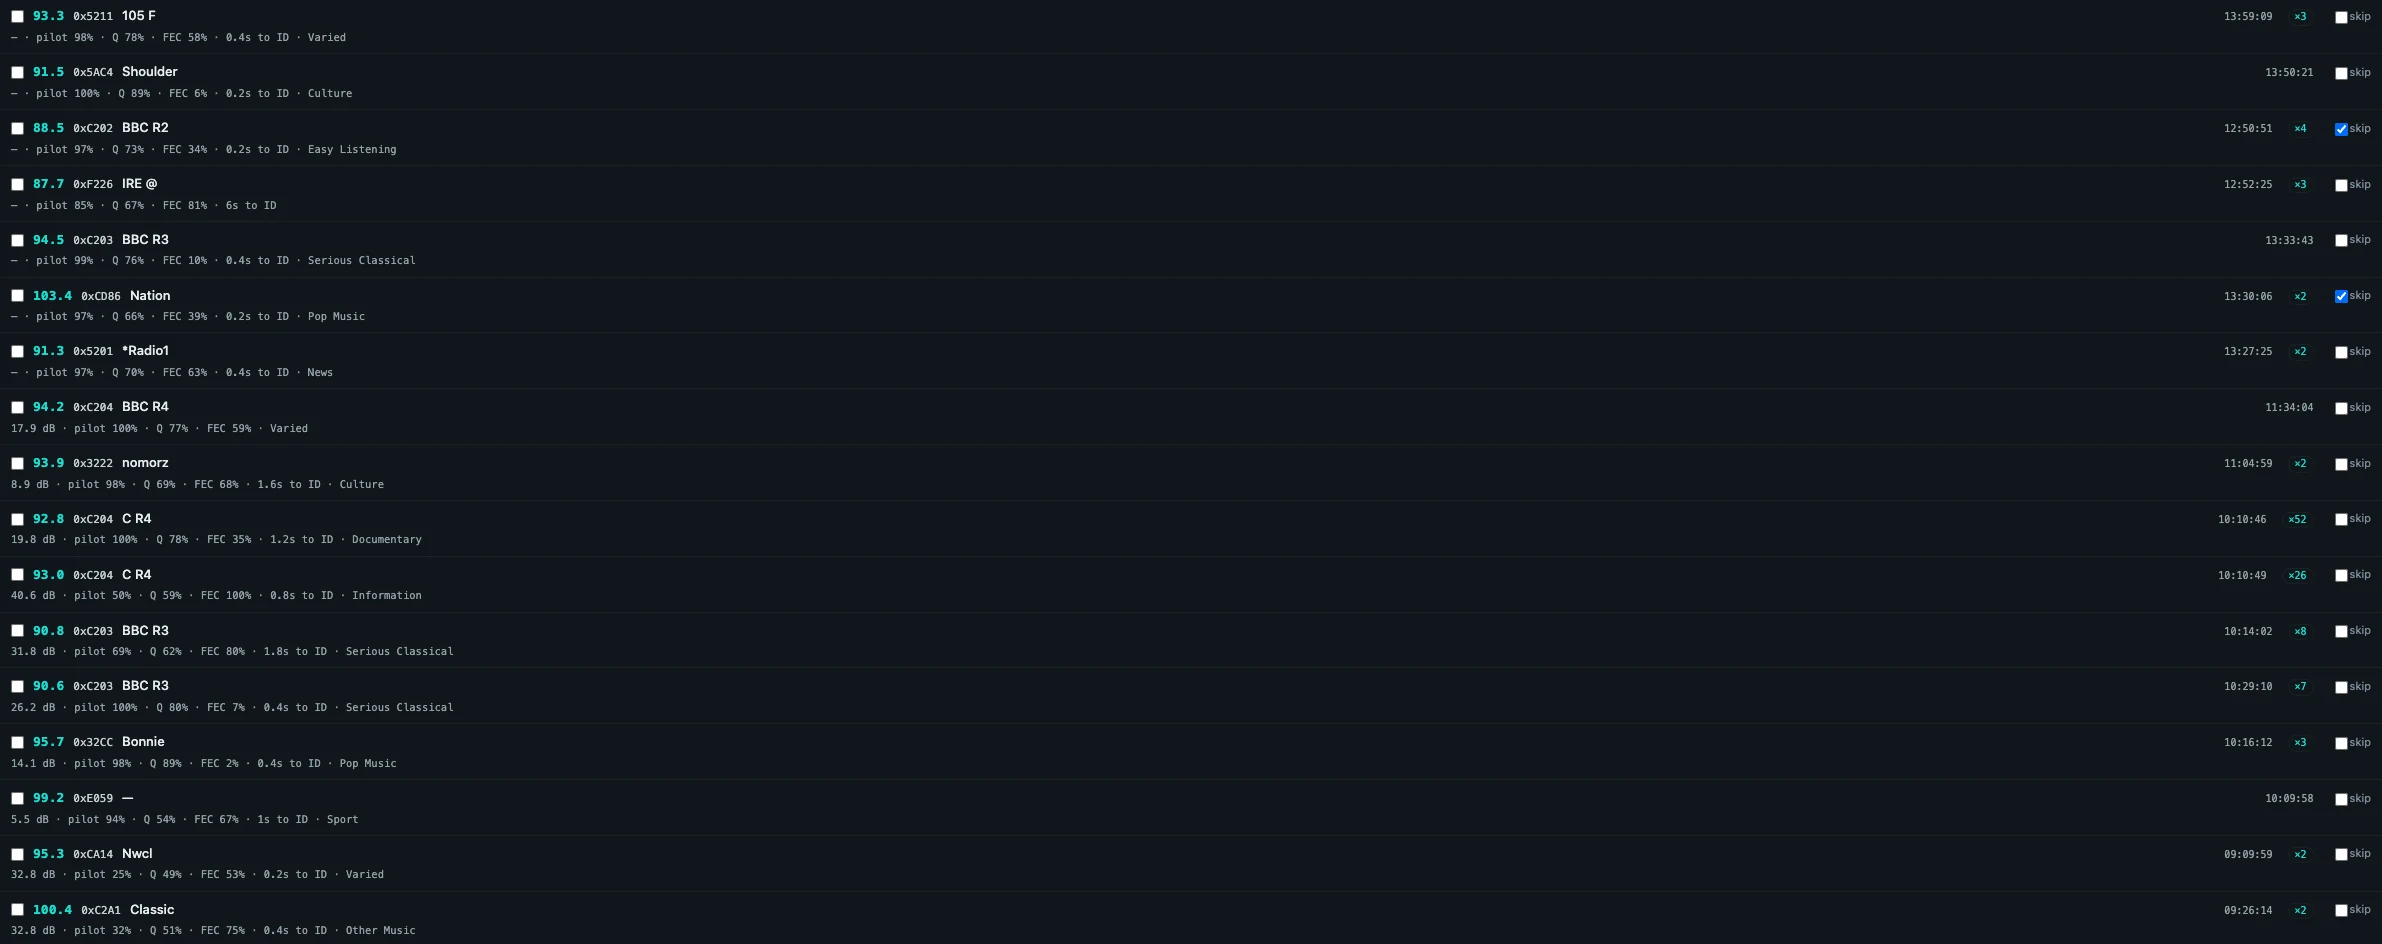
- Each row records frequency, PI, station name, time, signal level, pilot, decode quality, error correction and how long the identification took — so months later you can still see how solid a catch was.
- Repeats are counted, not duplicated. The same station caught four times shows as one row with a count.
- Export to CSV for your own records, or to import into whatever you log with.
- The skip column feeds the band scan — ticking your locals here is what makes DX watch worth leaving running.
12 · Knobs
Settings worth touching
Bridge works out of the box. These are the few controls that genuinely repay attention — and the honest note that most of the rest can be left alone.
Worth changing
- Channel spacing. Match it to your region, or the tuning steps and the band scan will march straight past real stations. Auto is right for most people.
- Channel bandwidth. Wider gathers more of the signal; narrower rejects the neighbours. If a strong local sits next to the channel you’re chasing, narrowing this is the fix for the neighbour-capture trap described above.
- Error correction depth. More correction pulls identities out of worse signals. It is adjustable rather than fixed because the right answer depends on what you’re doing, and because more correction always means more chances to be wrong.
- Antenna port, if your radio has more than one.
Leave alone unless you have a reason
The rest of the decoder settings have defaults chosen by measurement against real recordings. If you change several at once and things get worse, you won’t know which one did it — change one, and compare the same signal twice.
How to test a setting properly
Use a recording. A live signal is fading while you’re experimenting on it, so you can never tell whether the change or the propagation made the difference. In IQ File mode the same signal plays identically every time, which is the only way to get a straight answer.
13 · When it doesn’t work
If something isn’t working
Press self-check first
Top right of the window, next to help. It takes a few seconds and answers most of what follows without you having to work out which question you’re asking: it names the browser you’re actually using, confirms your copy of the file is complete, proves the decoder works by generating its own test signal and decoding it, and reports what is connected.
It writes a plain-English report to your Downloads folder. Nothing is sent anywhere — it’s yours to read, ignore, or email to us. It deliberately contains no file names, folder names, locations or serial numbers, and nothing from your DX log.
Nothing happens at all when I open the file
You are almost certainly in Firefox or Safari. Bridge needs a Chromium browser — Chrome, Edge or Brave. On a Mac, Safari is the default, so files open there unless you tell them not to. Right-click the file, choose Open with, and pick a supported browser.
Connect does nothing / it won’t connect to SDRConnect
Three things, in this order. One: is SDRConnect actually running with a device started and playing? Two: is WebSocket Server switched on in its Preferences? This is off by default and is the commonest single cause. Three: are you on SDRConnect 1.0.6 or later? Earlier versions have no WebSocket server at all.
It connects, but nothing decodes
Did you press Start as well as Connect? They are two separate things — the first opens the link, the second begins decoding.
If you did, tune to the strongest local station you have. If that won’t decode, run self‑check: it will tell you whether the decoder itself is healthy, which separates “the software is broken” from “the signal isn’t there”.
Windows Defender blocked the helper, or called it a virus
Expected, and it is a false positive. The helper is a small program from an individual developer, distributed without a commercial code-signing certificate, and Defender treats anything unfamiliar with suspicion — it is reacting to the absence of a certificate, not to anything in the program.
You don’t have to take that on trust. Every release includes a SHA256SUMS.txt listing the exact fingerprint of each file; check the file you downloaded against it, and you know you have precisely what was published. The helper’s guide shows the one command to do that. The helper is also open source — the whole program is on GitHub and you can build it yourself.
If you would rather not, you don’t need the helper for SDRConnect or IQ File mode at all.
macOS says the helper is damaged, or from an unidentified developer
Also expected: the Mac build isn’t signed with an Apple developer certificate. The helper’s guide has the exact steps — it is a one-time thing, and the same steps you may already have used for other radio tools.
In MPX mode I get silence, or a flat spectrum
Work backwards. Is the browser allowed to use audio input? It asks once; if you dismissed it, nothing will ever arrive. Have you picked the virtual cable rather than your real microphone? Is your SDR software sending composite/MPX rather than normal demodulated audio? Is the sample rate 192 kHz? The RDS sits at 57 kHz and simply isn’t present at a lower rate.
You’ve got it right when the MPX spectrum shows a clear spike at 19 kHz. Don’t judge it by the 57 kHz end — the RDS subcarrier is a low bump there even when the decode is working, so use the 57K confidence read-out instead.
The audio stutters when I play a recording
That means your computer can’t process that recording as fast as real time — not that anything is broken. The decoding is unaffected; you will still get every identification. Bridge tells you when it’s running below real time so you can tell the difference. Wide, high-rate recordings ask a lot of any machine.
A station is logged on the wrong frequency
Two likely causes. In MPX mode without the helper, Bridge has no way of knowing what your SDR is tuned to. In IQ File mode, check that the file name carries the right centre frequency — Bridge reads it from there, so a renamed or mislabelled recording decodes correctly and lands in the wrong place.
Otherwise, you may have caught a strong neighbour rather than the channel you’re on — see the trap in section 08.
It was working, and now it decodes nonsense
If you use the helper, check that it and Bridge came off the same release page. Don’t go by the version numbers — the helper is only rebuilt when it changes, so an older number alongside a newer Bridge is normal and correct. A genuinely mismatched pair doesn’t report an error; it produces garbage that looks exactly like a reception problem. Re-download both from one release and try again.
The band scan skips over stations I know are there
Check your channel spacing matches your region’s grid, and check the frequency isn’t on your skip list from an earlier session.
Where did my DX log go?
It lives in your browser, alongside the file. Clearing your browsing data can remove it, and some browser settings prevent it being saved at all — self‑check warns you if yours is one of them. Export to CSV after a good session and it’s safe on disk whatever happens.
Is anything of mine being uploaded?
No. The decoding happens in your browser, on your computer. There is no account, no telemetry and no server. The self-check report saves to your own Downloads folder and is sent nowhere unless you choose to email it.
14 · Still stuck
Getting help
Ask — that’s what these are for. It is a one-person project, so a little detail up front saves a lot of back-and-forth.
What to include
Which of the four modes you’re in, what radio and what software, what you expected, and what happened instead. If you can, run self‑check and attach the report — it answers most of the questions that would otherwise be the first three replies.
- The in-app help goes deeper than this page on every read-out and control, and it’s always the version that matches your copy.
- The README covers the same ground in more technical terms, plus the release history.
- RDS Bridge is free and MIT-licensed. Use it, modify it, build it into something else.